Article Series
- Tutorial 1: Angular JS
- Tutorial 2: Controllers
- Tutorial 3: Controllers
- Tutorial 4: Controllers : Advanced
- Tutorial 5: Models
- Tutorial 6: Services
This is the first tutorial among many to come on learning Angular JS. Since I am a .NET developer, I go on to use Visual Studio code as it is lightweight and suits web development environment.
Visual Studio code can be downloaded here.
You could still code with any of the available IDEs like Eclipse, Webstorm, and Sublime, etc.
Now what is Angular JS: It is a super heroic JavaScript framework by Google.
- It is very lightweight.
- Supports Single Page Application development. Which means only the first time the entire page is loaded fully, and subsequent request would load only the part in the page that has to change, thus making it very fast and responsive.
- Supports MVVM Architecture (liked by most .NET developers) thus helps in organizing JS code which otherwise is a total mess.
Simple, right? No, we will look at a traditional page request vs Angular JS page request.
Traditional
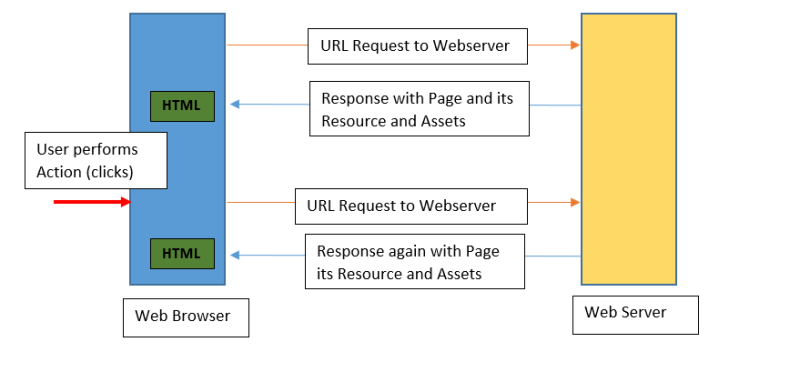
Angular JS: With Angular JS, the first part remains the same, i.e., URL request to Webserver and then the Webserver returns the Webpage and its Resources and then the browser loads the HTML page .
But what happens differently is the 2nd time when a user performs an action, JSON data is returned from the web server and it is loaded into the existing HTML page (loaded already).

We will understand the page life cycle of AngularJS after we understand some basics of Angular.
So we move on to create our first AngularJS application:
- First, for people using Visual Studio code, you need to create a page and then configure Task Runner to run that page. That can be done as below.
Use Ctrl+Shift+p to find Configure Task Runner. Change the parameters in tasks.json:
{
"version": "0.1.0",

"command": "explorer",

"windows": {
"command": "explorer.exe"
},

"args": ["Day1.html"]
}
- Now you can write the code as below:
<!DOCTYPE html>
<html lang="en" ng-app>
<head>
<meta charset="utf-8">
<title>Hello World</title>
</head>
<body >
<h1>Hello {{name}}</h1>
<input type="text" ng-model="name"/>

</body>
<script src="https://ajax.googleapis.com/ajax/libs/angularjs/1.4.3/angular.min.js">
 </script>
</html>
Note here: The source in the script tag has been taken from the Angular URL (https://angularjs.org/) and then click on download and then get the CDN part of it.
After we have the Angular URL in our script tag, we need to include “ng-app” in the main tag. And then, I have created an input tag with binds with name property and we can use this by referring to it like :“{{ PropertyName }}” .
So in this tutorial, we saw what is AngularJS and how to create our first Angular JS application.

