Introduction
This example shows you how you can create Nested GridView, i.e., GridView under another GridView using little JQuery code. Let's explain.
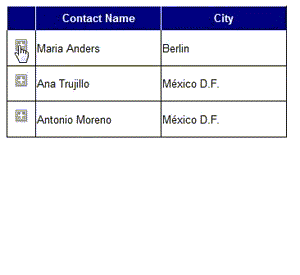
Nested GridView
Background
I’m using Northwind database here.
Quick Start
In Master GridView, I’ll show you the Customer’s details, i.e., ContactName and City from ‘Customer’ table. Then in the Child GridView, I’ll show you Order details of corresponding Customers, i.e., OrderID and OrderDate.
Creating Main GridView
<asp:GridView
	ID="grdViewCustomers"
	runat="server"
	AutoGenerateColumns="false"
	DataKeyNames="CustomerID"
	OnRowDataBound="grdViewCustomers_OnRowDataBound"
	CssClass="Grid">
	<Columns>
		<asp:BoundField
			ItemStyle-Width="150px"
			DataField="ContactName"
			HeaderText="Contact Name" />
		<asp:BoundField
			ItemStyle-Width="150px"
			DataField="City"
			HeaderText="City" />
	</Columns>
</asp:GridView>
So, now it shows only two columns, i.e., ContactName and City. Now, I’ll insert ‘plus sign image’ to the First Column of every row. This is because, when I click this ‘plus sign image’ then the Child GridView will be displayed and the ‘plus sign image’ will be the ‘minus sign image’. And when I click the ‘minus sign image’, the Child GridView will remove from our sight and ‘minus sign image’ becomes the ‘plus sign image’ like toggle. So, I’ve to take an ItemTemplate within a TemplateField inside the Columns at first position. Let's see:
<asp:GridView
ID="grdViewCustomers"
runat="server"
AutoGenerateColumns="false"
DataKeyNames="CustomerID"
OnRowDataBound="grdViewCustomers_OnRowDataBound"
CssClass="Grid">
<Columns>
<asp:TemplateField ItemStyle-Width="20px">
<ItemTemplate>
<a href="JavaScript:divexpandcollapse
('div<%# Eval("CustomerID") %>');">
<img alt="Details" id="imgdiv<%# Eval
("CustomerID") %>" src="images/plus.png" />
</a>
</ItemTemplate>
</asp:TemplateField>
<asp:BoundField
ItemStyle-Width="150px"
DataField="ContactName"
HeaderText="Contact Name" />
<asp:BoundField
ItemStyle-Width="150px"
DataField="City"
HeaderText="City" />
</Columns>
</asp:GridView>
Now, you see that I’ve linked a JavaScript function to the ‘plus sign image’ which does all the functionality that I’ve told above against the Click event of the ‘plus sign image’. This JavaScript function takes the Div name in which the Child GridView exists. There will be one Child GridView for each row of the Master GridView. So, the Div id must be different. That’s why I concatenate Div id with CustomerID and there will one ‘plus sign image’ for each row of the Master GridView, so I also concatenate the img id with CustomerID. Now let's add the Div just after the link of the ‘plus sign image’ and implement Child GridView under that Div:
<asp:GridView
ID="grdViewCustomers"
runat="server"
AutoGenerateColumns="false"
DataKeyNames="CustomerID"
OnRowDataBound="grdViewCustomers_OnRowDataBound"
CssClass="Grid">
<Columns>
<asp:TemplateField ItemStyle-Width="20px">
<ItemTemplate>
<a href="JavaScript:divexpandcollapse
('div<%# Eval("CustomerID") %>');">
<img alt="Details" id="imgdiv<%# Eval
("CustomerID") %>" src="images/plus.png" />
</a>
<div id="div<%# Eval("CustomerID") %>" style="display: none;">
<asp:GridView
ID="grdViewOrdersOfCustomer"
runat="server"
AutoGenerateColumns="false"
DataKeyNames="CustomerID"
CssClass="ChildGrid">
<Columns>
<asp:BoundField
ItemStyle-Width="150px"
DataField="OrderID"
HeaderText="Order ID" />
<asp:BoundField
ItemStyle-Width="150px"
DataField="OrderDate"
HeaderText="Order Date" />
</Columns>
</asp:GridView>
</div>
</ItemTemplate>
</asp:TemplateField>
<asp:BoundField
ItemStyle-Width="150px"
DataField="ContactName"
HeaderText="Contact Name" />
<asp:BoundField
ItemStyle-Width="150px"
DataField="City"
HeaderText="City" />
</Columns>
</asp:GridView>
Let's see the little JQuery which checks whether the ‘plus sign image’ source contains the path of the ‘plus sign’ image or ‘minus sign’ image and do the said functionality accordingly:
function divexpandcollapse(divname) {
	var img = "img" + divname;
	if ($("#" + img).attr("src") == "images/plus.png") {
		$("#" + img)
			.closest("tr")
			.after("<tr><td></td><td colspan =
			'100%'>" + $("#" + divname)
			.html() + "</td></tr>")
		$("#" + img).attr("src", "images/minus.png");
	} else {
		$("#" + img).closest("tr").next().remove();
		$("#" + img).attr("src", "images/plus.png");
	}
}
Now the client side part is over. The main part is how you fill the Child GridView? Don’t worry, there is an event which is triggered when there is one container control within the row of the GridView. The event is OnRowDataBound. And I’ve already added, this event to the Master GridView properties and the name of event handler is: grdViewCustomers_OnRowDataBound. And we also fill the Master GridView in the Page_Load() event. So let's implement:
protected void grdViewCustomers_OnRowDataBound(object sender, GridViewRowEventArgs e)
{
	if (e.Row.RowType == DataControlRowType.DataRow)
	{
		string customerID = grdViewCustomers.DataKeys[e.Row.RowIndex].Value.ToString();
		GridView grdViewOrdersOfCustomer =
		(GridView)e.Row.FindControl("grdViewOrdersOfCustomer");
		grdViewOrdersOfCustomer.DataSource = SelectData("SELECT top 3 CustomerID,
		OrderID, OrderDate FROM Orders WHERE CustomerID='" + customerID + "'");
		grdViewOrdersOfCustomer.DataBind();
	}
}

private DataTable SelectData(string sqlQuery)
{
	string connectionString =
	System.Web.Configuration.WebConfigurationManager.ConnectionStrings
                            ["SQLServerConnectionString"].ConnectionString;
	using (SqlDataAdapter sqlDataAdapter = new SqlDataAdapter(sqlQuery, connectionString))
	{
		DataTable dt = new DataTable("Customers");
		sqlDataAdapter.Fill(dt);
		return dt;
	}
}

protected void Page_Load(object sender, EventArgs e)
{
	grdViewCustomers.DataSource = SelectData
	("SELECT top 3 CustomerID, ContactName, City FROM Customers");
	grdViewCustomers.DataBind();
}
It's done!
History
This is the first release of this article. In the next release, I’ll show you how you add a button in nested GridView and how the whole thing can be done using AJAX. Thank you for reading!
CodeProject
If you have any doubts, please post your questions. If you really like this article, please share it.
Don’t forget to vote or comment about my writing.


