In this article, we are going to see few possible fixes we can apply when we get an error “Response to preflight request doesn’t pass access control check: No ‘Access-Control-Allow-Origin’ header is present on the requested resource. Origin ‘http://localhost:58018’ is therefore not allowed access”. We get this error when we are trying to get some data from another origin, maybe via an AJAX call. In this post, we will discuss the solutions for this error in detail and we will also discuss about Cross Origin Requests. Here, I am going to use Visual Studio 2015, Web API 2. I hope you will like this.
Background
I hosted my Web API in a server, and what that API does is, it will just return the data in JSON format. But when I try to consume this Web API via an Ajax call, I was getting the error “No ‘Access-Control-Allow-Origin’ header is present on the requested resource”. I solved the same issues in different ways. Here, I am going to share those.
Using the Code
I assume that you have created a Web API and hosted it in your server. If you are new to Web API, you can always get some information from Articles Related To Web API .
We all will have some situations where we need to fetch some data from another domain or another site, right? If it is from the same site, you won’t be facing any issues at all. Like you are calling an Ajax call from the page www.SibeeshPassion.com/Receiver.html to www.SibeeshPassion.com/Sender.html to get the data, here the origin is the same and therefore you will get the data. What happens is when the sender and receiver is not in same origin. Like you need to get the data from www.Microsoft.com by an Ajax call in www.SibeeshPassion.com/Receiver.html. The browser will not allow you to get the sensitive data from other domain, for security purposes, your browser will return “No ‘Access-Control-Allow-Origin'”. To overcome this, we have something called Cross Origin Resource Sharing (CORS). Basically the process of allowing other sites to call your Web API is called CORS. According to W3 Org, CORS is a standard which tell the server to allow the calls from other origins given. It is much more secured than using JSONP (Previously, we had been using JSON for getting the data from other domains.).
Fix To No Access-Control-Allow-Origin Header is Present
We can fix this issue in two ways:
- By using
Microsoft.AspNet.WebApi.Cors - By adding header information in Web.config
We will explain both now.
By Using Microsoft.AspNet.WebApi.Cors
To work with this fix, you must include the package by using Microsoft.AspNet.WebApi.Cors from Manage Nuget window.
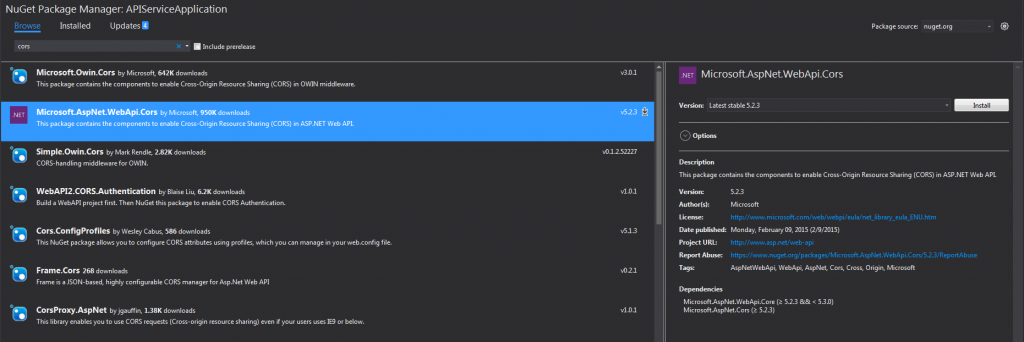
CORS_In_Manage_NuGet_Package
Now, go to App_Start folder from your solution. Then, click on the file WebApiConfig.cs, this is the file where we set the configuration for our Web API.
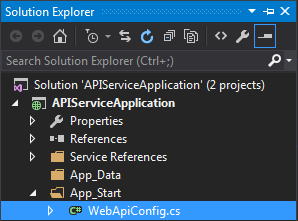
Web_API_Config_Class_File
Then, you can add the preceding codes in the static function Register.
var cors = new EnableCorsAttribute("*", "*", "*");
           config.EnableCors(cors);
IF you do this, the CORS will be applied globally for all the Web API controllers you have. This is the easiest way of doing it. Now, if you want to see the metadata of EnableCorsAttribute, you can see find it below.
public EnableCorsAttribute(string origins, string headers, string methods);
As it is mentioned, it accepts the parameters origins, headers, methods. Here, we pass * to all the three parameters to make everything allowable.
You can also try the same as below in the Register function. Here, we are going to apply CORS for a particular controller, which means it will be applied for all the actions in the controller. Before that, make sure you have added the preceding code in your WebApiConfig.cs file.
config.EnableCors();
And in the API controller, you need to set the origins, headers, methods as preceding.
using System;
using System.Collections.Generic;
using System.IO;
using System.Linq;
using System.Net;
using System.Net.Http;
using System.Web.Http;
using Newtonsoft.Json;
using Newtonsoft.Json.Converters;
using System.Configuration;
using System.Data;
using System.Data.SqlClient;
using System.Runtime.Serialization;
using System.Text;
using System.Web;
using System.Web.Http.Cors;

namespace APIServiceApplication.Controllers
{

    [EnableCors(origins: "*", headers: "*", methods: "*")]
    public class DefaultController : ApiController
    {
    }
}
Make sure that you have added namespace using System.Web.Http.Cors; to use CORS. You can always disable CORS in an action by using [DisableCors].
namespace APIServiceApplication.Controllers
{

    [EnableCors(origins: "*", headers: "*", methods: "*")]
    public class DefaultController : ApiController
    {
        [DisableCors]
        public string XMLData(string id)
        {
            return "Your requested product" + id;
        }
    }
}
Here, we have disabled CORS for the action XMLData. And again, if you need to apply CORS only in a single action, you can do that as follows:
namespace APIServiceApplication.Controllers
{
    public class DefaultController : ApiController
    {
        [EnableCors(origins: "*", headers: "*", methods: "*")]
        public string XMLData(string id)
        {
            return "Your requested product" + id;
        }
    }
}
I hope you are aware of how to enable CORS now.
By Adding Header Information in Web.config
Another fix we can do is add some tags in our Web.config file.
<system.webServer>
     <httpProtocol>
       <customHeaders>
         <add name="Access-Control-Allow-Origin" value="*" />
         <add name="Access-Control-Allow-Headers" value="Content-Type" />
         <add name="Access-Control-Allow-Methods" value="GET,POST,PUT,DELETE,OPTIONS" />
        <add name="Access-Control-Allow-Credentials" value="true" />
       </customHeaders>
     </httpProtocol>
 </system.webServer>
As you can see, we have added keys with value for the listed items:
- Access-Control-Allow-Origin (For Origin)
- Access-Control-Allow-Headers (For Headers)
- Access-Control-Allow-Methods (For Methods)
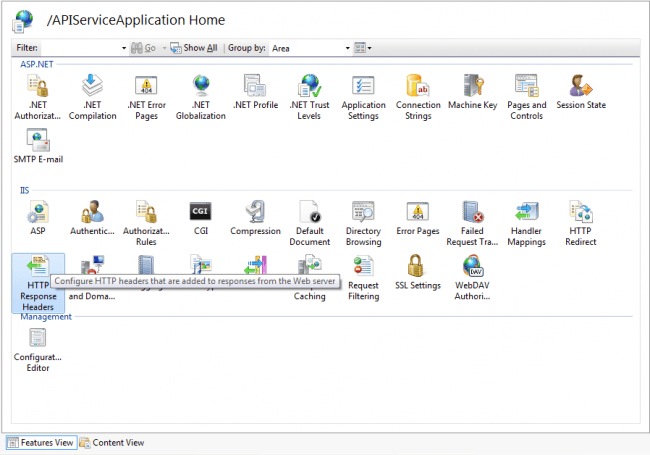
Now if you go to your server and check, you can see that all the things are configured perfectly. I have configured my API in my server IIS, so I am going to see my Response Header settings in IIS.
Go to command window and type inetmgr and click OK, your IIS will open shortly, now find your Web API which you have already configured under Default Web Site. Before doing this, please make sure that you have configured IIS in your windows. If you don’t know how to configure, I strongly recommend you read Configure IIS in Windows.

Configured_Web_API_in_IIS
Go to Features View and double click on HTTP Response Headers under IIS category.
HTTP_Response_Headers_In_IIS
You can see all the settings have been configured there.
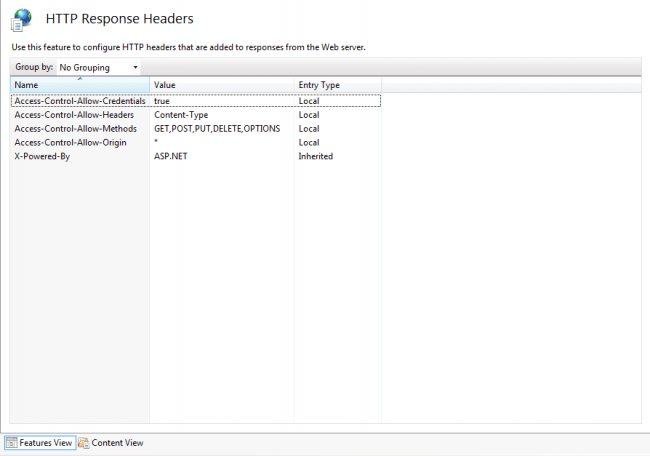
HTTP_Response_Headers_Available
That’s all, now if you run your application, you will be able to fetch the data from your Web API.
Conclusion
Did I miss anything that you think is needed? Have you ever faced this issue? Did you try Web API yet? I hope you liked this article. Please share your valuable suggestions and feedback.
Your Turn. What Do You Think?
A blog isn’t a blog without comments, but do try to stay on topic. If you have a question unrelated to this post, you’re better off posting it on C# Corner, Code Project, Stack Overflow, ASP.NET Forum instead of commenting here. Tweet or email me a link to your question there and I’ll definitely try to help if I am able to.

