I was trying to get my engine perform better on older iDevices. I need to be able to render 18 characters on screen simultaneously, however on the 1st gen iPod touch, it takes 63ms to render the scene. I thought I’d try to use VFP assembly to speed it up, using code from this site: http://code.google.com/p/vfpmathlibrary/.
Initially, it didn’t make any difference at all. This was because it was GPU bound. So, I reduced the scene to 8 skinned meshes – which would show up optimisation improvements better.
The assembler code still didn’t speed things that much. I ran the code analyzer tool and found the piece of code that most of the time was code that transforms the vertices with the current matrix of the joint:
for (n = 0; n < (int)m_listVertex.size(); n++)
{
weight = m_listWeight[n];
index = m_listVertex[n]*3;
matrix.TransformPoint(&pOrigData[index],weight, &pCurrData[index]);
}

void Matrix::TransformPoint(const float* pInVertex, float weight, float* pOutVertex) const
{pOutVertex[0] += weight*(pInVertex[0]*m[0] + pInVertex[1]*m[4] +
    pInVertex[2]*m[8] + m[12]);pOutVertex[1] += weight*(pInVertex[0]*m[1] +
    pInVertex[1]*m[5] + pInVertex[2]*m[9] + m[13]);
    pOutVertex[2] += weight*(pInVertex[0]*m[2] + pInVertex[1]*m[6] +
    pInVertex[2]*m[10] + m[14]);
}
There was a function similar to this in the vfpmathlibrary. So I modified it and this is the result:
#define VFP_VECTOR_LENGTH_ZERO "fmrx r0, fpscr \n\t" \
"bic r0, r0, #0×00370000 \n\t" \
"fmxr fpscr, r0 \n\t"
#define VFP_VECTOR_LENGTH(VEC_LENGTH) "fmrx r0, fpscr \n\t" \
"bic r0, r0, #0×00370000 \n\t" \
"orr r0, r0, #0×000″ #VEC_LENGTH "0000 \n\t" \
"fmxr fpscr, r0 \n\t"
void Matrix::TransformPoint(const float* pInVertex, float weight, float* pOutVertex) const
{
asm volatile (
// Load the whole matrix.
"fldmias %[matrix], {s8-s23} \n\t"
// Load vector to scalar bank.
"fldmias %[pInVertex], {s0-s2} \n\t"
// Load weight to scalar bank.
"fldmias %[weight], {s3} \n\t"
"fldmias %[pOutVertex], {s28-s30} \n\t"
VFP_VECTOR_LENGTH(2)
"fmuls s24, s8, s0 \n\t"
"fmacs s24, s12, s1 \n\t"
"fmacs s24, s16, s2 \n\t"
"fadds s24, s24, s20 \n\t"
"fmuls s24, s24, s3 \n\t"
"fadds s24, s24, s28 \n\t"
// Save vector.
"fstmias %[out], {s24-s26} \n\t"
VFP_VECTOR_LENGTH_ZERO
:
: [matrix] "r" (m),
[pInVertex] "r" (pInVertex),
[weight] "r" (&weight),
[out] "r" (pOutVertex)
: "r0″, "cc",
"s0″, "s1″, "s2″, "s3″,
"s8″, "s9″, "s10″, "s11″, "s12″, "s13″, "s14″, "s15″,
"s16″, "s17″, "s18″, "s19″, "s20″, "s21″, "s22″, "s23″,
"s24″, "s25″, "s26″, "s28″, "s29″, "s30″
)
}
It took me quite a while to figure out the assembler, because you need to reference several very technical books to figure it out. I’d like to make this job easier for any interested programmers out there. So, just let me explain it line by line.
On the first line, you have: asm volatile(…); .This instructs gcc that the stuff in the ( ) brackets is assembler code. volatile means, tells gcc not to try to "optimize" the code.
Then you have a number of strings each string is an arm VFP instruction.
The VFP has 4 banks of 8 single precision floating point registers:
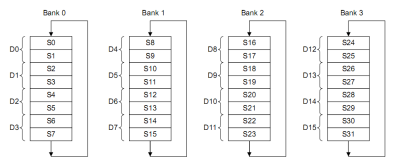
The idea is that you can do up to 8 similar floating point operations at the same time. If you look at the formula that we’re trying to implement again:
pOutVertex[0] += weight*(pInVertex[0]*m[0] + pInVertex[1]*m[4] + pInVertex[2]*m[8] +
    m[12]);pOutVertex[1] += weight*(pInVertex[0]*m[1] + pInVertex[1]*m[5] +
    pInVertex[2]*m[9] + m[13]);pOutVertex[2] += weight*(pInVertex[0]*m[2] +
    pInVertex[1]*m[6] + pInVertex[2]*m[10] + m[14]);
You see that we could do pInVertex[0]*m[0], pInVertex[0]*m[1] and pInVertex[0]*m[2] all in one instruction. And the rest of the formula is done the same way – three operations all in the one go.
So, let’s go through the code line by line.
First you have: "fldmias %[matrix], {s8-s23} \n\t"
fldmais loads memory contents into several registers. Here, it’s loading the entire matrix (16 floats) into s8-s23. (It doesn’t actually use all the data in the matrix, but it’s easier to do it all in one instruction).
The "matrix" is an assembler variable defined in the section at the bottom, but we’ll cover that later.
Notice, there is \n\t at the end of the line. That's just to format the assembler code. It’s just something that you have to add to each assembler line.
Next, we have: "fldmias %[pInVertex], {s0-s2} \n\t".
This loads the 3 vertex co-ords into s0-s2 – i.e. bank 0. Bank zero is different than the other banks, but I’ll go into that later.
Then, we load the weight and the output vertex co-ords into other registers:
"fldmias  %[weight], {s3}      \n\t"
"fldmias  %[pOutVertex], {s28-s30}      \n\t"
So, now we have everything loaded.
Next, we have to tell the VPF how many ops we do at the same time. We have a macro:
VFP_VECTOR_LENGTH(2)
This sets the vector length setting to 3 (it’s actually one more than the specified parameter).
So, now it’s time to do the fun part: the math ops!
The first op is: "fmuls s24, s8, s0 \n\t".
This is equivalent to three single vector ops:
fmuls 24, s8, s0
fmuls 25, s9, s0
fmuls 26, s10, s0
s0 is in bank 0 and this bank has a special function: the address never increments for a vector operation ( a so-called scalar vector). Now, if you remember, we had the matrix data in s8-s23 and the vertex data in s0-s3. So this function does the following calculation:
s24 = pInValues[0]*m[0]
s25 = pInValues[0]*m[1]
s26 = pInValues[0]*m[2]
We are always dumping the results into s24-s26, which we use as temp registers.
The next instruction is:
"fmacs s24, s12, s1 \n\t"
fmacs multiplies, then adds. So this instruction is the equivalent to:
s24 += pInValues[1]*m[4]
s25 += pInValues[1]*m[5]
s26 += pInValues[1]*m[6]
Then:
"fmacs s24, s16, s2 \n\t"
As you probably guess, this is the equivalent to:
s24 += pInValues[2]*m[8]
s25 += pInValues[2]*m[9]
s26 += pInValues[2]*m[10]
Then:
"fadds s24, s24, s20 \n\t"'
As you might guess, this is addition:
s24 += m[12]
s25 += m[13]
s26 += m[14]
Then multiply by the weight which is stored in s3:
"fmuls s24, s24, s3 \n\t"
s24 *= weight
s25 *= weight
s26 *= weight
Finally, add to the current vertex data (which we stored in s28-s30):
"fadds s24, s24, s28 \n\t"
s24 += pOutValues[0]
s25 += pOutValues[1]
s26 += pOutValues[2]
Then, we load the result back into the current vertex data:
"fstmias %[out], {s24-s26} \n\t"
And the VFP_VECTOR_LENGTH_ZERO macro restores the vector size back to the default value of 1 (otherwise all hell would break loose).
The stuff at the end tells gcc the inputs and output of the function. There always have to be three sections separated by colons:
: : [matrix] "r" (m),
[pInVertex] "r" (pInVertex),
[weight] "r" (&weight),
[pOutVertex] "r" (pOutVertex) : "r0", "cc", "s0", "s1", "s2", "s3",
"s8", "s9", "s10", "s11", "s12", "s13", "s14", "s15",
"s16", "s17", "s18", "s19", "s20", "s21", "s22", "s23",
"s24", "s25", "s26", "s28", "s29", "s30"
The first section is the output parameters, which is blank. This doesn’t make any sense, because really it should have pOutVertex, but apparently it just works that way – don’t ask me why.
The next section is the input parameters. First, you have the variable name used in the assembler code surrounded by square brackets [], then you have a "r" then the variable name as used in the C++ part of the code in round brackets (). Note: This has to be an address, *not* a value, that’s why the weight has a & in front of it.
The next section is what is affectionately known as "the clobber list". This tells gcc what registers we have used in the program. If you accidentally forget to include a register in the clobber list, it’ll crash, so this is important.
I found that the program could be speeded up even more by moving the VFP_VECTOR_LENGTH macros from TransformPoint to outside of the main loop:
SetVectorLen2();
for (n = 0; n < (int)m_listVertex.size(); n++)
{ weight = m_listWeight[n]; index = m_listVertex[n]*3; matrix.TransformPoint(&pOrigData[index],
weight, &pCurrData[index]); } SetVectorLen0();
All in all, the assembler code reduces the total render time from 34ms to 30.5ms (when rendering 8 skinned meshes), which is not bad.
If you try to run this code on a newer device, like a iPhone 3GS, you’re in store for a surprise as the 3GS has no VFP unit and it actually reduces the performance by a large amount  .
.
But don’t worry about this because the 3GS goes so fast it doesn’t really need assembler.

